I guess you missed my point - anybody who wants to do this conversion already has the drill/slot guide in their possession.
It took me less time to create the drill guide than it took you to cut and paste your reply from the internet.
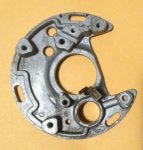
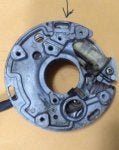
It will work on ANY single or twin. In case you missed the procedure here it is in detail
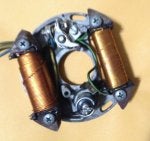
Take your existing stator
Remove coils, points, condenser
Save the parts in suitable container for later reuse
DONE
===> Then WHY, haven't YOU and these other SMART PEOPLE here Done it already? I put the INFO out probably 3-4+ years ago when I didn't even have the Parts of Engines to look at, just Photo's, YOU and these other People probably have many old Engines laying around your shop!!! YOU, still haven't PROVEN your THEORY YET. You only have (3) Case Studs to Work with and only need (2) to secure the Plate. Like I said, were talking about a Conversion for the OTHER COMMON SINGLES (247/250, 292, 299/300, 318/320, 335/340) which are DIFFERENT from the very LIMITED BUILT POINTS 277!!! It took me over a year an a half to even find the 277 Points Flywheel to go with my Crank. PROVE YOUR THEORY for US!!!
YES, the MAGNETS on the POINTS FLYWHEEL have to be in the right POSITION to make it FIRE where you WANT. So you do have (2) Options REKEY the FLYWHEEL the PROVEN WAY, or REPOSITION the MAGNETS on the FLYWHEEL, which NO ONE, even YOU, HASN'T DONE it YET. All of you Bright People here haven't Figured it out Yet have You. YOU and THEY have been following this thread for HOW LONG NOW?
Instead of some People COMPLAINING and WHINING about EVERYTHING in these different Threads, Trying to PROVE SOMEONE WRONG, ACTUALLY TRY to CONTRIBUTE SOMETHING POSITIVE HERE in these Threads. Like I said, YOU'RE the FIRST in 3 YEARS to ACTUALLY CONTRIBUTE SOMETHING to this THREAD! <=====
Now for all your expertise about 277s there are a few things you still don't know. There is a fact you might want to consider.
The change in the 277 crankshaft taper and Keying was NOT about the CDI.
1st year CDI used point crank. The later crank change was about using the the same flywheel as the 377 CDI motors for manufacturing economy not function.
1980 point crank 420-994-760
1981 point crank 420-994-765
1982 CDI crank 420 -994-765
1983-84 CDI crank 420-995-300
POINT BEING - CDI trigger has NOTHING to do with crankshaft keying.
It has to do the final relation between the flywheel magnets and the coil. That's why no matter what you do with your drill fixture - you will still need to test that relation in real life.
====> Sightation, First of all I have never claimed to have Expertise in anything, I leave that to you Smart Guys, who think they know everything. This Thread is not about Converting the Limited Built 1980-81 Points 277 to CDI! I told You, and these People, it has to do with the Coils Relation to the Magnets to Fire already. That FLYWHEEL KEY sets the POSITION. So you have (2) Options, REKEY the FLYWHEEL the PROVEN WAY, or MOVE the MAGNETS!!! If YOU think moving the Magnets is easier, then DO IT! The 277 POINTS Flywheel Magnets are in a different relation X Pattern than the other Old Singles in a Cross Pattern. The Flywheel Keys are also different Widths 3mm vs 5mm. <=====
That test can be done TODAY without ever touching a mill or drill. No need to wait until a trip to Grizzly tools to buy a rotary table.
Finally, because it seems no post can be valid without lots of internet cut and paste of tools here's what is required for my method.
====> IF, you wish to try and Jury Rig it Half A$$, then by all means do it. I don't try to do things that way. You have a Precision SLOT on a RADIUS that use's a 4mm Stud with Clearance in the Thousandths of an Inch, and you have (3) Studs which CENTERLINE is very PRECISE that needs that Slot Placed Precisely to be able to turn Freely to make them Timing Adjustments. The Whole Point of making the Slot is to make it Work for All the Common Old Singles. If you wish to use a Hammer, Rock, Screwdriver, Hand Drill, Chisel, File, Paper, Pencil, etc., to accomplish your Task, then by all means, DO IT! That $50 Drill Press and Cheap Rotary Table I showed you could make you $$$ at Home doing these Points to CDI Conversions. I'm Retired with about $7000 a month coming in till I die, with also a very healthy Wife's 401K, $400,000+ to also draw from if needed, so I/We don't need the extra $$$. So with all your Intelligence, put it to work making you $$$. Don't just Talk about it. I Designed my own Home with Paper & Pencil & Built it at Age 25, about 35 years ago. I have done complete Frame Off Restores of many Cars. What have you Designed & Built? Sometimes, you have to Spend $$$ to make even more $$$$$. It's called Investment in your Time & Money. All Tools, Pay for themself real quick, even the Expensive ones. If you want to use Hand Tools to do (1) XYZ Part at so much Time, or use a Power Tool that you can do (5) XYZ Parts in the same Time. So a 1-5 Ratio. So that Free CAD Drawing(Your Time), and that 3D Printed ($22) Drill Jig, means you can Convert more Stator Plates in the same amount of Time. Hopefully, you make it so simple your Kids, or Wife can even Help you do it.
Many of You, who have been into Sleds for a long time, have used, Good Nippon Horse Shoe Stators, CDI Box, and CDI Coils sitting in your Shop/Garage that YOU could have done these (2) MODS a long time ago, 4+ years for sure. So, Why haven't YOU? <====