Ski-Doo Snowmobiles Forum banner

Alpha LED lights by SII

18K views 73 replies 19 participants last post by  tricountytrail  
#1 ·
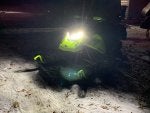
Just changed my stock headlight bulbs to the Alpha LED bulbs (H13) by SII and what a huge difference in lighting! I had been reading the various opinions between SII and Beam-techs and felt like I would take a chance on the more expensive SII bulbs. I am so impressed with the increased performance of the headlights. For an aging rider with not so young eyeballs, these lights are a much welcomed improvement. I have now ordered a set for my 2007 Skidoo Legend. No more yellow lights for this rider!
 

Attachments

#4 ·
I took my Alpha Gen 2's out and installed Alpha Gen 3's..they seem very bright but need snow to test! Mother nature has NOT been cooperating.
 
#5 ·
My Alpha Gen 3's just arrived, I'm installing them today, and with any luck I may try and get out tonight and try them out.

I'm curious how the Silverstars compare to the Alphas. Let us know, when you do the comparison.
 
#11 · (Edited by Moderator)
Installed a set of Alpha 3s the other night. Here's a few tips:
1. The bulbs install with the open (narrow) edge of the blade in the 6 o'clock position.
2. The drivers are installed on the flat spots on both sides of the glove box.
3. The drivers can be mounted on the flat spots using 3m extreme strength double sided tape.
4. Use alcohol to clean both the flat (lettered) side of the drivers and the plastic flat spot to remove oils.
5. Make sure to orient the bulbs in a vertical (plumb) position by looking at the LED blade assembly from the front of the sled. These can be manually rotated by hand to set the beam pattern. They should be a 12 and 6 o'clock. Again the narrow open side of the blade should be down or at 6 o'clock.
6. Have the bulb (gray) connectors sticking out behind the glovebox (not underneath) when you put everything back together and before you put the gauge pod back in. It's a tight fit but it all goes back together very nicely if you have a little patience.
 
#13 ·
Installed a set of Alpha 3s the other night. Here's a few tips:
1. The bulbs install with the open (narrow) edge of the blade in the 6 o'clock position.
2. The drivers are installed on the flat spots on both sides of the glove box.
3. The drivers can be mounted on the flat spots using 3m extreme strength double sided tape.
4. Use alcohol to clean both the flat (lettered) side of the drivers and the plastic flat spot to remove oils.
5. Make sure to orient the bulbs in a vertical (plumb) position by looking at the LED blade assembly from the front of the sled. These can be manually rotated by hand to set the beam pattern. They should be a 12 and 6 o'clock. Again the narrow open side of the blade should be down or at 6 o'clock.
6. Have the bulb (gray) connectors sticking out behind the glovebox (not underneath) when you put everything back together and before you put the gauge pod back in. It's a tight fit but it all goes back together very nicely if you have a little patience.
Thanks exactly what I was looking for.
 
#14 ·
The only thing I will add, is that the instructions for setting your bulbs correctly are poor. Look through the front of the lens when trying to line up the 3 tabs, and make sure the wiring harness (coming out of the back of the bulb assembly) is facing in the down position. I initially had mine facing to the side, and my high beams did not aim correctly. After rotating my bulbs to allow for the wiring to face down, my low beams and high beams aimed perfectly.

I will also add that after riding 50 miles in the dark last weekend, my new Alpha gen 3s lit up the trail very well. I am very pleased with the brightness!

Installed a set of Alpha 3s the other night. Here's a few tips:
1. The bulbs install with the open (narrow) edge of the blade in the 6 o'clock position.
2. The drivers are installed on the flat spots on both sides of the glove box.
3. The drivers can be mounted on the flat spots using 3m extreme strength double sided tape.
4. Use alcohol to clean both the flat (lettered) side of the drivers and the plastic flat spot to remove oils.
5. Make sure to orient the bulbs in a vertical (plumb) position by looking at the LED blade assembly from the front of the sled. These can be manually rotated by hand to set the beam pattern. They should be a 12 and 6 o'clock. Again the narrow open side of the blade should be down or at 6 o'clock.
6. Have the bulb (gray) connectors sticking out behind the glovebox (not underneath) when you put everything back together and before you put the gauge pod back in. It's a tight fit but it all goes back together very nicely if you have a little patience.
 
#16 ·
I finally installed mine and rode with them last night. I'm very happy with them, and they are a huge improvement over stock. My buddy was riding behind me and asked, "what lights to do have???" "It looks like daylight, riding behind you, my lights suck, they are yellow and dim!"

If you are looking for a great LED, these are very nice!
 
#17 ·
Installed a set of Alpha 3s the other night. Here's a few tips:
1. The bulbs install with the open (narrow) edge of the blade in the 6 o'clock position.
2. The drivers are installed on the flat spots on both sides of the glove box.
3. The drivers can be mounted on the flat spots using 3m extreme strength double sided tape.
4. Use alcohol to clean both the flat (lettered) side of the drivers and the plastic flat spot to remove oils.
5. Make sure to orient the bulbs in a vertical (plumb) position by looking at the LED blade assembly from the front of the sled. These can be manually rotated by hand to set the beam pattern. They should be a 12 and 6 o'clock. Again the narrow open side of the blade should be down or at 6 o'clock.
6. Have the bulb (gray) connectors sticking out behind the glovebox (not underneath) when you put everything back together and before you put the gauge pod back in. It's a tight fit but it all goes back together very nicely if you have a little patience.
#5 is wrong...... 3 o'clock, and the other set facing at 9 o'clock. This will allow a nice and even 360 light distribution
 
#18 ·
That would be contrary to what sii said in an email to me on #5?
 
#20 ·
#5 is wrong...... 3 o'clock, and the other set facing at 9 o'clock. This will allow a nice and even 360 light distribution
#5 is NOT wrong. You misinterpreted what I wrote. The BLADE is at 12 and 6 o'clock (or oriented vertically. The yellow LED clusters are at 3 and 9 O'clock (point towards the sides of the sled). I hope this isn't going to cause a bunch of confusion now.
 
#22 · (Edited by Moderator)
#5 is NOT wrong. You misinterpreted what I wrote. The BLADE is at 12 and 6 o'clock (or oriented vertically. The yellow LED clusters are at 3 and 9 O'clock (point towards the sides of the sled). I hope this isn't going to cause a bunch of confusion now.
This is how I have mine now, seem good but no snow to test. Although the manual says fat side down not up so 180 degrees reversed
 
#25 ·
Picture sent from sii
 

Attachments