Ski-Doo Snowmobiles Forum banner

Mikuni Carb Differences

7.2K views 20 replies 4 participants last post by  film495  
#1 · (Edited by Moderator)
I had pulled the carbs off the 343 and 440 and started to clean them up. Made the mistake of not keeping track of which internals went to which carb bodies. As far as I can tell they are the same, and I don't find any identifications for model etc on either carb. The only piece with a nuber on it I could find was the seat - and they are the same number.

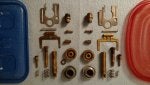
So, I started looking at the individual pieces and there are only 2 things I found that do not look exactly the same.

1. What I think is the main air screw is much longer on one of them.

2. One of them had a washer, which I believe goes between the needle tube, and the main jet and circular piece, that would extend the jet a little lower in the bowl. Maybe the other one was just missing that piece?

I didn't compare the pistons, I have those put aside separately, that might be my next step. Knowing one of these came of a 343 and one came off a 440, can you tell which one is which?
 

Attachments

#2 ·
Something doesn't seem right.

The washer under MJ is not part of either original carb + the idle adjustment screws as far as I remember should be the same.

Meaning, the only difference between the original carbs is the bore size + jets & slide.
 
#3 ·
It's possible that washer came from somewhere else in the carb, but the other one does not have that piece. I'll have to look at a parts breakdown, always easier to take apart than put back together .. lol

well, sticking to bore and jet and slide. I have the pistons separate and I know which is which - they are slightly different and have different numbers. how would I check the bore and jets? I know which carb body is which, but can't tell them apart other than one has some weathering the other does not.
 
#4 · (Edited by Moderator)
The ID on intake(engine) side will determine carb body.

The 340 should be 30mm ID

The 440 should be 34mm ID

All jets + slide are numbered to identify.
 
#6 ·
Mikuni carbs of that era either had the large washer ( baffle plate ) or the small brass washer but NOT both. I believe you should have the baffle plate in both and put the small brass washer into your tickle trunk. The carb needs one or the other to secure the needle jet in place. What you call the main air screw is the idle speed screw, all it does is raise or lower the throttle slide ( piston valve ). There is two screws in carbs you are not showing, they are smaller and turn with a flat blade screw driver these adjust idle air, that is the only external adjustments there is, the fuel jets are "fixed", 100s of variables all set by the factory as new and in most cases important you keep it as the factory spes.

Being you have carbs from a 440 and 343, you should most likely find on the side of the needle jet a 159-P2 or 159 P-6 from the 440 and likely a 159-Q0 or 159-Q2. As OSN says numbers on all likely a 320 or 340 on the main for the 440 and about a 260 main for the 343.
You also are not showing the idle pilot jets, very important you pull them and clean or replace them.

Check out the thread on this site "cleaning a Mikuni carb"
 
#7 ·
excellent - an extra piece is better than a missing one ..

one main jet says 320 and one says 350. the needle jet numbers and letters you saying look like what I read as well (definitely remember seeing a P and a Q), but could not read fully by eye and wrap around so, taking a picture did not work -- need to find myself a good olf fashioned magnifying glass.

odd thing was the hole in the jet that read 320 was clearly larger than the one reading 350

I've seen several videos - my mistake was trying to do two at the same time … My mistake was giving the pieces a hot water rinse after carb cleaner, and instead of dumping the hot water out into the sink (so none of the parts would end up there), I dumped the parts with the water into a bowl, and then dumped the water out of the labeled container saying 343 or 440. after I rinsed both sets of parts in hot water, I looked down at the table and both sets of parts were in unmarked bowls, with no indication of which one they came from; woops - should have just dumped the water into the bowl, and kept the parts in the labeled container at all times … live and learn.
 
#8 ·
oh - current thinking is the 350 jet and the extra washer were from the same sled, and if that is the 343 which currently I'm thinking, but need to look better with a magnifying glass at all the numbers to make sure - that carb and motor had been put in a go-kart, so - possibly had been modified by someone who knew what they were doing ... lol to make it run in summer temperatures .. they did manage to burn a piston ..
 
#9 ·
had a minute to check it again, and I read it wrong - it said 250 not 350 so that makes sense. Also, checked the needle jets and they match exactly what 396F/A put for those models. I double checked against a service manual and again it matches. I actually had guessed which parts were which carb correctly, but you can see looking at the attached picture, it all looks the same - I was not aware of the nearly microscopic numbers on the individual parts … so, learned something new.

Blue - 343 on Left

Red - 440 on Right

The covers, pistons, needle, and seat needle are separated in other containers so I can be more careful with those pieces.

These have been cleaned, but will probably get cleaned again before it gets put back together. I'm not in a rush, they don't have motors to run quite yet.

Thanks for helping me get this worked out.
 

Attachments

#10 · (Edited by Moderator)
That washer you posted above does not go with this carb as 396F/A posted.

I assume you have but just not in the picture is the "O" ring for the drain plug + 2-red gaskets for under the needle&seat/baffle plate.

What I always do when assembling a Mikuni carb is to first write all jet specs on a piece of paper and as I assemble confirm the numbers. Just my way to be sure. :)
 
#11 ·
That washer you posted above does not go with this carb as 396F/A posted.

I assume you have but just not in the picture is the "O" ring for the drain plug + 2-red gaskets for under the needle&seat/baffle plate.

What I always do when assembling a Mikuni carb is to first write all jet specs on a piece of paper and as I assemble confirm the numbers. Just my way to be sure. :)
I just don't know what to do with it yet, so keeping together with where it came out of for now. I only have one O ring / one was missing - but, I have carb kits coming - hope it is part of that. Will be interesting to see what they include in the carb kits; I have the small red washers that go with the seat and the plate, but am hoping I can just put all new seals and gaskets.

That sounds like a smart check, think I'll do that - since I'm working with 2 that are very similar I've already gotten mixed up a little.
 
#12 ·
the 440 carb, had a good size nest in the airbox, and the mouth of the carb that attaches to the airbox was black and very rough, but for a couple specs this did not extend past the mouth of the intake. How smooth does this surface need to be? I scrubbed it with a kitchen scotch bright metal pad, and it is not rough now, but you could probably still feel it with a finger, but not very noticable. Should this be polished smoother more with steel wool, or is pretty much smooth good enough?
 
#13 ·
I don't see why smooth should not be good enough.
 
#14 ·
yea, I think I'm lucky it didn't seem to affect how the carb will work at all, pretty lucky ... think is was the same creatures that left this little spot at the bottom of the housing ... that's after being hit with degreaser and scrubbed with a brush, think I'm using the wrong cleaner for that spot and I should just be using Ajax, or Pinesol ... lol
 

Attachments

#15 ·
Started looking at putting this carb back together and assembling the motor and getting that done this fall as part of seasonal maintenance. figure it's been apart long enough - and I already forgot most of it, so -, just needs to get done, while I think I still know where all the parts are ...
 
#16 ·
I just tried to find all the parts and dry assemble the carb for the 79 Rotax Type 343 to see if I had all th parts. Odd thing is - and forgive me if I don't use the correct names for the pieces - where the baffle plate is held on by the needle jet, without that washer, the baffle is loose - to have it snug required that little brass washer. The only thing I could think of that would create some misalignment would be if the large brass pieces that fits down through - that the needle jet screws into may not be seated fully down, but it appears correct, so - a little thrown or maybe that long brass piece was a replacement or something that was slightly different dimensions?

Oh well, good news is I think I found all the parts and more or less remembered how to put it back together...
 
#18 ·
- where the baffle plate is held on by the needle jet, without that washer, the baffle is loose - to have it snug required that little brass washer. The only thing I could think of that would create some misalignment would be if the large brass pieces that fits down through - that the needle jet screws into may not be seated fully down, but it appears correct, so - a little thrown or maybe that long brass piece was a replacement or something that was slightly different dimensions?
Maybe check the needle jet ( long brass tube). For a 30 to 34 mm carb it should be a series 159. The series 166 look very, very similar. They are actually for 38 mm.

It should say on the side where you are finding Q-0 etc. Should say 159 Q-0 etc. NOT 166 Q-0 etc. Just a thought, might explain why it seems loose ??
 
#19 ·
I don't have an immediate plan/use for the carb, so I think I'm just going to get it assembled and put away. The other thing that I didn't like seeing was the bowl appeared to have some cracks in it, when I was sort of looking it over - made me wonder if it will be a leaker. not sure if there is any way to test it - or if I can just get a replacement bowl if it is cracked, there's no fix for a cracked bowl I assume, no?
 
#20 ·
Are you sure the brass washer isn't just a broken piece of the baffle? I've seen that happen. It still works fine, but just don't over-tighten the main jet.
anything is possible, but it really seems like a separate piece - and fits perfect. the needle jet - the log brass tube piece that fits down through the carb body, is short just the perfect depth of that washer, without the washer the baffle does not snug up when the little jet that screws into it is tightened.
 
#21 ·
Maybe check the needle jet ( long brass tube). For a 30 to 34 mm carb it should be a series 159. The series 166 look very, very similar. They are actually for 38 mm.

It should say on the side where you are finding Q-0 etc. Should say 159 Q-0 etc. NOT 166 Q-0 etc. Just a thought, might explain why it seems loose ??
thanks. before I clean it again and set it up to run - I'll look at the needle jet and check the numbers. It did not seem to install correctly to me - meaning - it dropped down in about 80% and then to get it to go all the way into position, I had to get a screwdriver in there and tap it in pretty good with a hammer. I put a pad on it to not damage it - but, it seemed to take more force to get it in than it should have, but I've only taken that piece out and reinstalled a couple times, so - it is a learning experience.