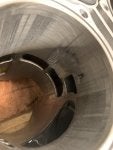
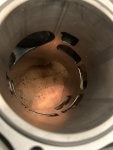
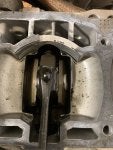
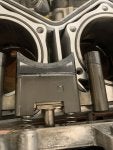
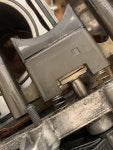
Those are your RAVE valve, which are variable exhaust valves. Nothing to do with the main engine oiling, but they look very clean, compared to other pix of RAVE valves posted in this forum. They do receive oil directly from the lubrication system.
This system has an electronically controlled oil pump and the ECM controls the oil flow to and through the crank, and the excess oil at the rod bearings is flung up and and round and oils the cylinders, pistons, and piston pins. So it is not the tradition 2S gas-oil mix type of lubrication.
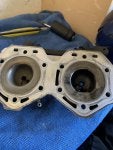
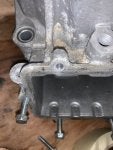
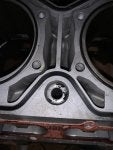
Each cylinder has a line to the outer crank bearing. These lines are routed on the outside of the engine and have check valves. It is certainly possible that the line to the bad cylinder got pinched or has a leak, or a fitting is plugged, or something is wrong with the check valve, and that side got starved of oil. If that was the case, then the main and rod bearings at that end would be a suspect for damage too. (All of that would be coming apart for me anyway for inspection for issues like the crank, given the engine's recent serious failure.)
BTW, you can find your engine's manual here:
Ski Doo Shop Manuals Bulletins Campaigns | Skidoo
Look for the "2019 600r-850 ETEC" manual. All of this lubrication system info came from there.
@850 guy -- The website
@nm9stheham shared is INVALUABLE to get the shop manual. (-I highly suggest to at least send the folks enough for a beer or six pack). My recommendation is to get both the MY 2019 850 ETEC and the 2017 850 ETEC. While the differences between 2017 and 2019 are almost negligible, the 2017 has graphics in color and they are very clear. The exact same pages dealing with the exact same areas of the sled in the 2019 are b/w and a little fuzzy. The text is the same for both. Like I said, the differences are almost negligible, however, depending on how you go forward rebuilding the engine, there are a couple very important details. I am describing a little bit of that in the other thread
2017 Rotax Rebuild Questions, where there is an update to the "engine support plate" that eliminates all but two of the lowest oil tubes to this part on the engine. As I assume there are others who may look to this thread for similar reasons to yours and mine, I wanted to offer the following as encouragement for the process--
If someone has any engine rebuilding experience, the shop manual helps quite a bit in this process for the 850 ETEC. While everything isn't as straightforward as a rebuild manual like the iconic "How to keep your VW alive--A manual of step by step procedures for the complete idiot" book, it does have 98% of what you need in pretty clear language. Basic rebuilding skills and tools should make the process something most can accomplish successfully. However, if someone knows only enough to put fuel in the tank and maybe change spark plugs, I wouldn't say rebuilding an 850 is in their wheelhouse without considerable guidance and maybe even someone else who does have those skills lending a hand. Take that for what it is--the last thing anyone needs to do is cause themselves to be stranded (or worse yet hurt) due to not doing a complete rebuild job. There are quite a few reputable places to have it done, and the cost is definitely worth it for the reasons I mentioned. I have quite a bit of experience from being a mechanic in the military all the way to rebuilding my own engines and I still worry. However, I enjoy taking things apart and putting them back together, so taking this slow and methodical has been my focus. Plus, if something doesn't go quite right all I have to blame is myself.
With all that said, yes, you will have to have the machine put back into break in mode, as well as have the oil pump calibrated by a reputable shop with BUDS software. You will have to decide how far you tear into the engine and as
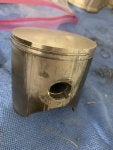
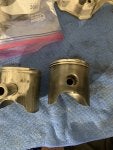
@nm9stheham mentioned, based on what you found so far, the prudent mechanic will most likely want to inspect the crank bearings and runout to ensure those crucial items were not impacted by whatever led to the visible damage to the pistons.
If you take a look at the other thread I mentioned, I show the lubrication "flow chart" from both the 2017 and the 2019 service manuals. It shows how all things get lubrication, and from my VERY basic sleuthing on the 2019 part change of the "engine support plate", Doo simply changed that part for MY 2019 without making any changes to the flow in the case itself. Now, for MY 2020 and after, I do see that the case (block, whatever) part number changed in the fische, whereas 2017-2019 it was the same PN.
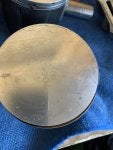
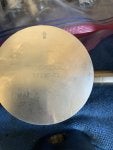
Lastly, as I knew I would be sooooo far into the sled by doing all of this, I budgeted to replace LOTS of things. Magneto, starter bendix (mine has electric start that was intermittent), all the cooling hoses and clamps, thermostat, some busted up plastic items on the airbox (damage from one or all of the PO's) and even got a brand new factory 165"/3" track. When I bought my sled it had Silber Turbo on it, so my choice of pistons with new cylinders was based on my riding elevation (9,000'-12,000' ASL) as well as potentially putting the turbo back on. My sled ran when I purchased it, but it had an annoying check engine beeping when I tried to go WOT, and even with Dynamo Joe's iBackshift clutching on it wouldn't hold above 7,000 RPM for more than a few seconds. Did a compression check and found both pistons were at or below 95psi. So I decided to do this over the summer/fall, before the snow flew again this winter.
Just a couple screenshots showing the easy to read 2017 color graphics vs 2019. Both are great, but if you need visual clarification for taking apart or assembly, 2017 is much clearer.
![]()
![]()